


How to make a no discard sourdough starter for beginners! If you are looking for an easy way to make your very own sourdough starter from scratch you came to the right place! I'm going to show you a no fuss way to make a sourdough starter that works every time!
This post includes two ways to make an easy sourdough starter, the classic method, and the no discard method. Both ways will give you an active bubbly sourdough starter that you can bake with. I'll be covering the sourdough starter without discarding first, then the classic starter at the bottom.
All you need to make a homemade no discard sourdough starter are a few basic supplies, and just 2 ingredients: flour and water.
Sourdough is an amazing base in many delicious bread recipes and will give you a unique flavor from the wild yeast! If you already have an active sourdough starter, make sure to try out my popular Sourdough Cinnamon Rolls Recipe!
NO DISCARD SOURDOUGH STARTER FOR BEGINNERS
I learned how to make a sourdough starter years ago, and it did not come without trial and error. There are far too many opinions out there on sourdough, so really just pick a sourdough recipe that sounds good to YOU and fits YOUR lifestyle. And stay away from ones that make sourdough so complicated!
Sourdough is not complicated, and should not complicated. Sourdough is meant to be fun, it is meant to feel relaxing, and making sourdough is meant to put you in touch with your creativity.
I initially made a classic "discard half and feed" sourdough starter years ago, and was able to maintain a beautiful bubbly starter. I took it from my fridge when needed, discarded a bit and fed it to get it bubbly for a recipe. You can store your discard in another jar in the fridge to save for quick breads and sourdough discard for a no waste sourdough discard.
But, I recently made a no discard sourdough starter from scratch and loved how simple and straight forward it was. For a no discard sourdough starter, you basically add smaller feedings to a jar without discarding anything for about a week to 10 days. Once it is doubled in size after feeding, you bake a bread with it and store the rest in the fridge.
When you want to make bread, you pull your starter jar from the fridge, feed it the amount of starter you need for your recipe to wake it up, use that amount, and store the rest in the fridge again.
It is so easy and requires almost no thought!
But, if the discard half and feed the other half makes more sense to you, then do it that way!
NO DISCARD SOURDOUGH STARTER INGREDIENTS
I love going back to the old fashioned way and making recipes with just real food ingredients. It is so interesting to me that in the old days, they made their own wild yeast with wheat flour and water and baked with that every day.
These days, we typically rise our bread with active dry yeast or instant yeast. If you want to add a lot of flavor and personality to your bread, try making a sourdough starter!
Ingredients for a no discard sourdough starter recipe:
- 100% whole wheat flour
- Room temperature filtered water
Note, if you want to make a white flour sourdough starter you can follow the same steps. However, I found that a 100% whole wheat flour is very strong and has so much flavor as it contains the entire wheat grain, and all the nutrients that comes with that.
GUT HEALTH BENEFITS OF SOURDOUGH
Sourdough bread isn't just delicious, it’s also a gut friendly choice. Thanks to its natural fermentation process, sourdough offers several digestive and microbiome boosting benefits:
- Easier to Digest. The fermentation process breaks down gluten and phytic acid, two compounds that can be difficult for some people to digest. This makes sourdough a gentler option compared to conventional bread, especially for those with mild gluten sensitivities (though not for those with celiac disease).
- Rich in Probiotics & Prebiotics. While the baking process kills live probiotics, the lactic acid bacteria (LAB) in sourdough produce beneficial byproducts, such as short-chain fatty acids and organic acids, which promote gut health. Additionally, sourdough contains prebiotics—fiber compounds that feed good gut bacteria, helping them thrive.
- Supports a Balanced Microbiome. A healthy gut microbiome is crucial for digestion, immunity, and even mental health. The fermentation in sourdough lowers its pH, creating a less favorable environment for harmful bacteria while encouraging beneficial gut flora.
- Less Bloating & Blood Sugar Stability. Many people report feeling less bloated after eating sourdough compared to regular bread. This is likely due to its lower gluten content and slow fermentation, which can reduce gas production in the gut. Plus, sourdough has a lower glycemic index than standard white or whole wheat bread, meaning it leads to a slower rise in blood sugar levels, preventing spikes and crashes.
- Increases Nutrient Absorption. The fermentation process enhances the bioavailability of nutrients like iron, magnesium, and zinc, making them easier for your body to absorb. This can contribute to overall digestive health and better nutrient utilization.
TOOLS YOU NEED TO MAKE A NO DISCARD SOURDOUGH STARTER
You really don't really need much for a no discard sourdough starter, so don't buy into anyone that claims you need a specific jar, or a special mixer, or a special scraper.. it is totally unnecessary. Sourdough is simple and should not be complicated!
All you really need to make a sourdough starter from scratch is:
- 32 ounce glass jar with a lid
- Any spoon or even a butter knife to stir it
- A rubber spatula to scrape the excess sourdough off the sides of your glass
- Any natural fiber cloth or towel
And that is it! Chances are that you probably already have all of these items in your kitchen already so you don't have to spend any money to make a sourdough starter from scratch!
Note, make sure you are growing your no discard sourdough starter in a glass jar and not a plastic one. Wild yeast in sourdough starters can interact with a plastic container and contaminate your sourdough starter.
TIPS TO MAKE A NO DISCARD SOURDOUGH STARTER
I have been through a lot of trial and error with ferments and the number one tip I have is temperature!! Always remember cold=mold. So if you live somewhere cold like me, make sure to always wrap your starter with a towel when you're feeding your sourdough starter. Even better if you keep your growing sourdough starter in the microwave or oven wrapped in the towel to protect it from drafts.
- START WITH WHOLE WHEAT FLOUR. Whole wheat flour has a diverse colony of good bacteria along with nutrients to get your no discard sourdough started.
- KEEP YOUR SOURDOUGH STARTER IN A WARM PLACE. Cold=mold. Keep your sourdough starter in a warm place while you are growing it! I keep mine either wrapped in a towel on top of the stove, or inside the stove with the oven light on.
- USE UNBLEACHED FLOUR TO FEED. Make sure you feed your sourdough starter with more 100% whole wheat flour, or unbleached white flour. The bleach in conventional flours can kill the wild yeast in your sourdough starter.
- USE FILTERED WATER NOT TAP WATER. Certain contaminants in tap water like chlorine can kill yeast and good bacteria in your sourdough starter. Make sure you are feeding your starter with filtered room temperature (not cold & not hot) water.
- USE ROOM TEMPERATURE WATER. Water should not be ice cold and should not be boiling. You don't have to do anything fancy other than keep a filtered water glass at room temperature before feeding.
HOW TO MAKE A NO DISCARD SOURDOUGH STARTER FOR BEGINNERS
This no discard sourdough starter recipe is perfect for first time sourdough makers! It requires no discarding and the measurements are extremely straight forward. You will need a kitchen scale to measure your flour and water. I find that for beginners, weighing your flour and water is actually much easier than using a cup measurement! There will be no guess work that you got the correct ratio because you are weighing exact measurements for your sourdough feedings.
STEP 1: GATHER YOUR NO DISCARD STARTER SUPPLIES
For a no discard sourdough starter you will need:
- A glass 32 ounce jar with a wide mouth
- A lid for the jar, you could even use a towel or cheesecloth
- A kitchen scale
- Any spoon to stir your starter
- Any spatula to scrape the jar down
- Rubber band to check how much your starter has grown
- Whole wheat flour
- Filtered Water
That's all you need! If you already love to bake at home, I'd bet you probably already have all of these tools. Maybe you need to get the kitchen scale, and don't bother with anything fancy mine was less than $10 and works perfectly fine!
STEP 2: ADD 25 GRAMS FLOUR + 25 GRAMS WATER EVERY DAY
Pick a time you want to commit to for a week, either the morning, afternoon, or evening. I chose to feed my no discard sourdough starter every morning around 10am.
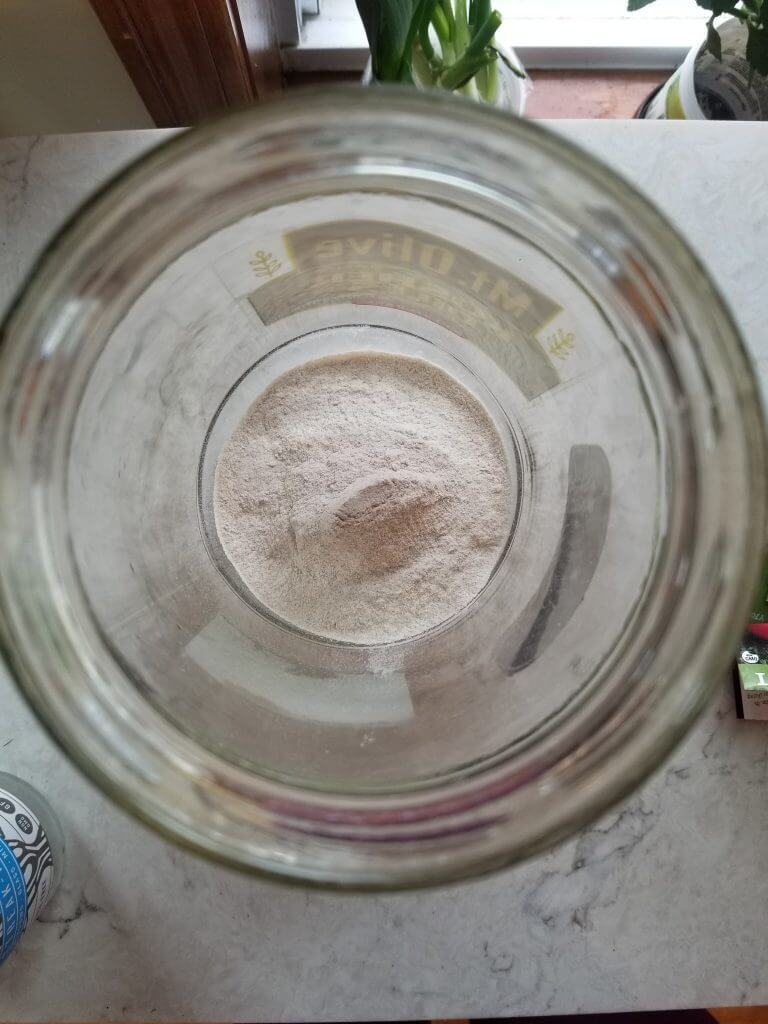
Get your scale, add your 32 ounce glass jar on top. Select grams for the measurement unit. Zero the scale so you are not weighing the weight of the jar.
Add 25 grams of whole wheat flour.
Add 25 grams of filtered room temperature water.
Mix until all the flour is wet. Use a spatula if needed to scrape the sides of your jar down to the bottom. Try to get every bit of flour on the bottom and not stuck on the sides.
Cover your jar with a lid, NOT sealing it tight, but just loosely covering it.
Place your no discard sourdough starter jar somewhere warm to rest. I like to put mine in the oven with the oven light on for a little extra warmth in the cold winter days.
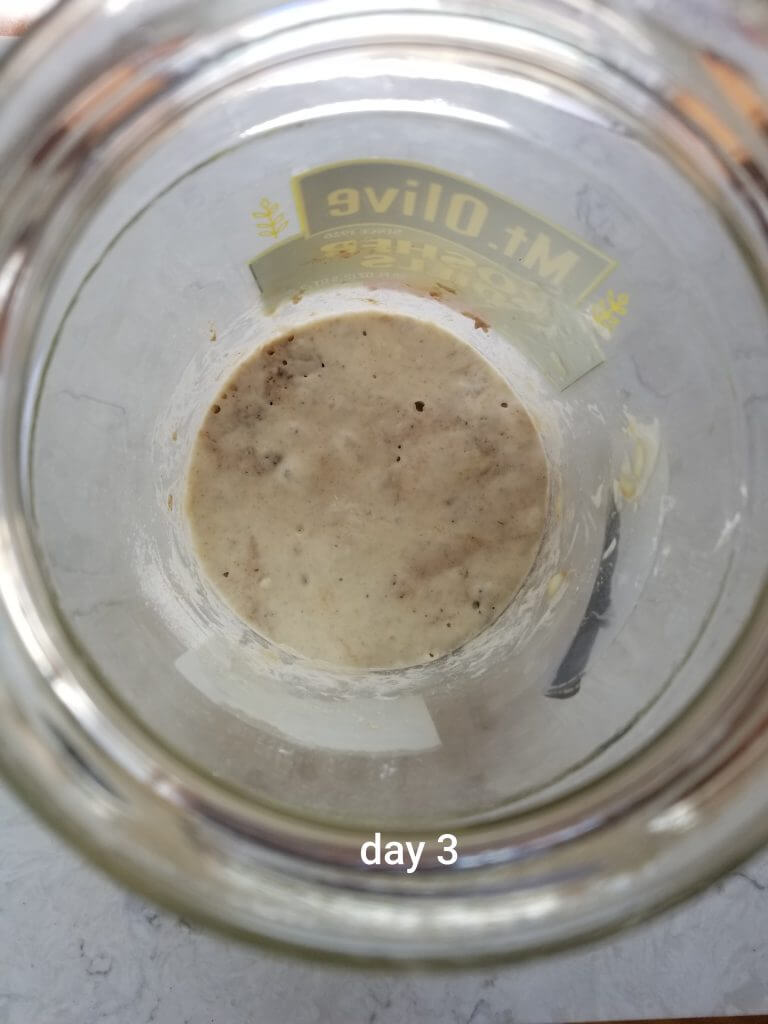
Repeat this for the next 4-5 days at the same time once each day: add 25 grams whole wheat flour and 25 grams of water to your jar. Mix, scrape down, store somewhere warm.
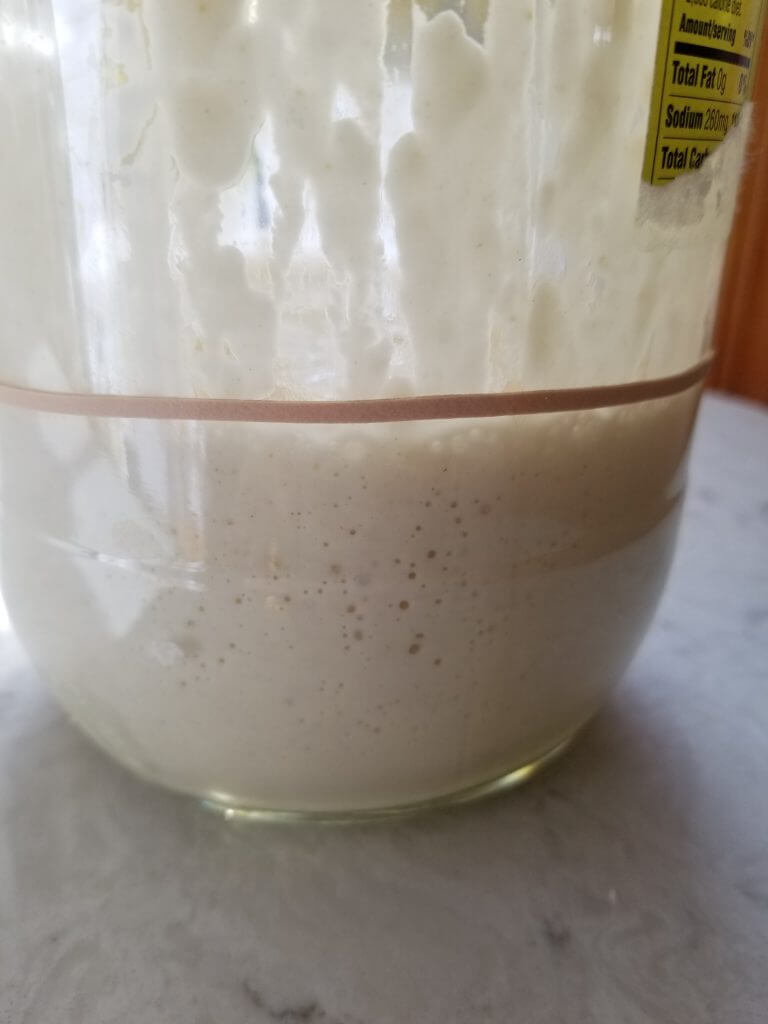
On day 4 or 5 you can use a rubber band on your jar to see how much your starter is growing after feeding.
STEP 3: CHECK FOR SOURDOUGH ACTIVITY USING A RUBBER BAND
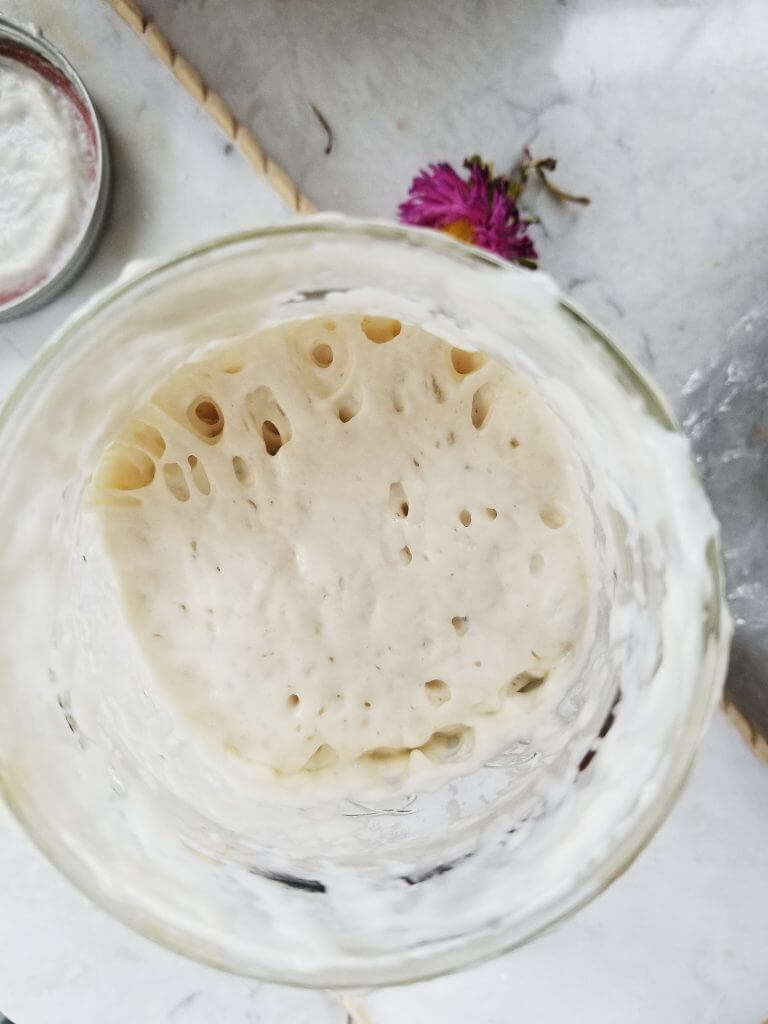
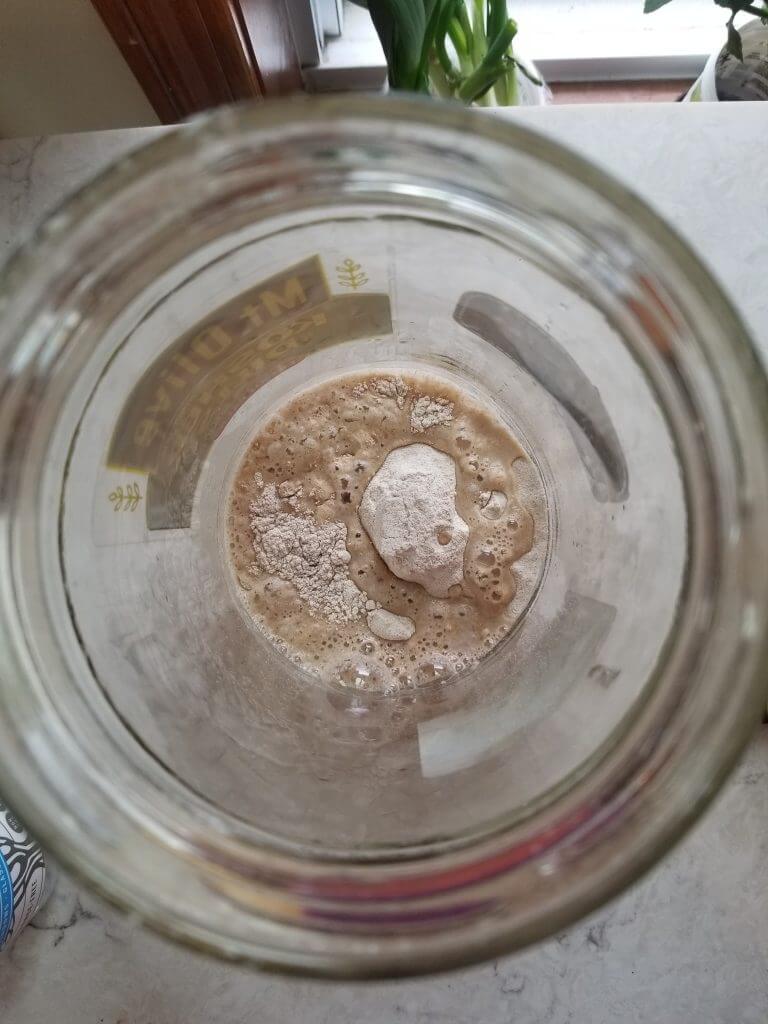
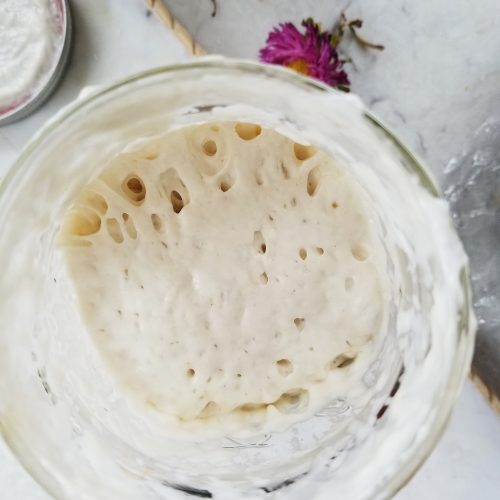
At this point, on day 4 or 5, you should be seeing some bubbles on the side of your jar and on the top of the starter, this is GREAT and means that your starter has living wild yeast!
After feeding it the daily 25 grams of whole wheat (or unbleached white flour at this point, though I prefer only wheat flour in my starter) and 25 grams of water, place a rubber band right at the same level as the starter.
The next day or in the next 8-12 hours you should see the sourdough starter rising above that rubber band!
Ideally, you are looking for your no discard sourdough starter to be doubling in size. Meaning, after 8-12 hours the rubber band will be in the middle and you'll see a lot of bubbling/ activity.
Don't worry if it takes a long time to double, or if it's not super active like some of the videos you might see out there. You have a brand new sourdough starter and it's not going to be bubbling and popping as much as one that's years and years old.
But it will be effective to bake with, and you can maintain it for years to come to get to that point where your starter doubles in just a couple hours and looks like a living thing!
STEP 4: USE OR STORE IN YOUR FRIDGE FOR BAKING
On day 7 your no discard sourdough starter should be doubling in size or at least close to it. At this point when it is at it's highest rise, you can use it for a sourdough bread recipe!
If you are not ready to bake yet and want to just maintain your sourdough starter, simply cover it tightly with a lid and place in your fridge!
When you are ready to bake, simply take your no discard sourdough starter from the fridge and add the amount you need for your sourdough recipe. Once it doubles in size, pour out that exact amount into your mixing bowl, and store the rest in the fridge. No need to discard!
- Recipe needs 100 grams active sourdough: feed 50 grams of water and 50 grams of flour, wait until it is double in size (active) and use it in your recipe!
- Recipe needs 200 grams of active sourdough: feed 100 grams of water and 100 grams of flour, wait until it is double in size (active) and use it in your recipe!
- Etc. If you have questions on this leave me a comment below!
You can also choose not to feed it/ wake it up and simply mix it straight from the fridge into a "sourdough discard" recipe. Sourdough discard recipes are basically recipes that use unfed sourdough straight from the fridge and rely on baking powder or baking soda to rise the bread. It's a great way to use your sourdough starter if you're new to baking and want to just play with learning to feed and grow your starter.
IS YOUR STARTER DOUBLE IN SIZE? YOU CAN BAKE WITH IT RIGHT NOW!
I noticed a lot of videos and blogs out there write blog posts about sourdough baking and label it as a beginners post, but are using terms that might not make sense to sourdough beginners.
Sometimes, when we are doing something for so long, we forget what it was like in the early learning days!
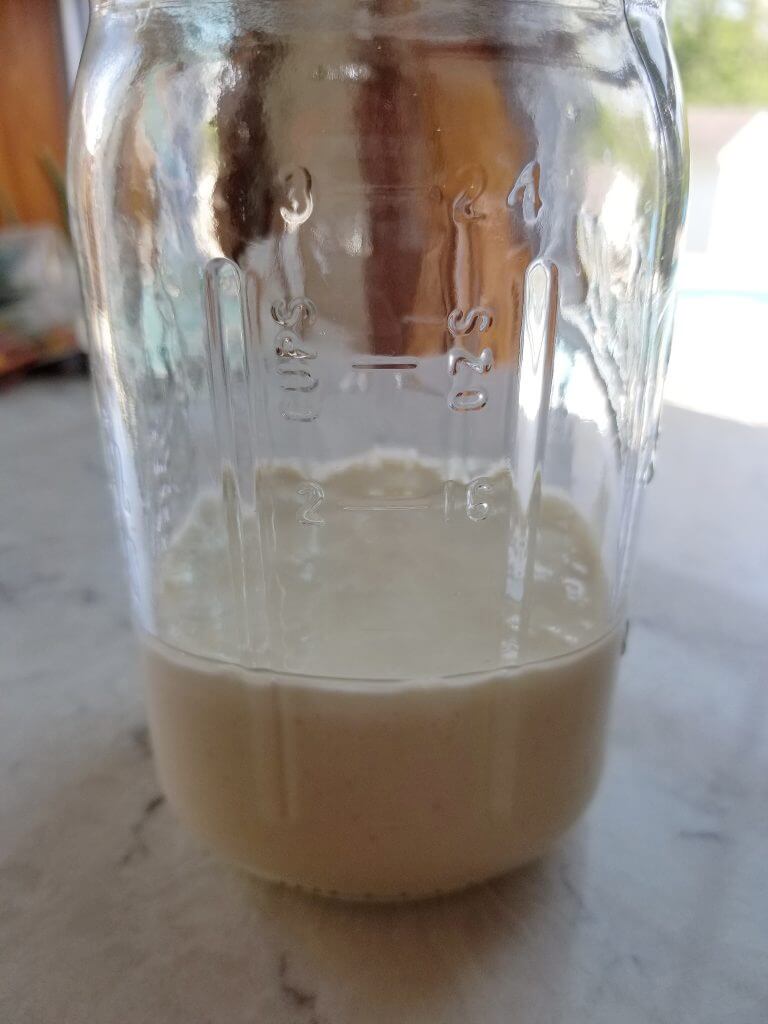
So now that you have your 7 day old sourdough in the jar, you should see that it is bubbly and has doubled in size in about 12 hours. Usually you let it sit all day or overnight and check it to see how much it is growing. The growth is the wild yeast eating the "food" of the flour and water you just added to the jar.
When it is double, this means it is at the most active point and can rise your bread! You add another bowl onto a kitchen scale and zero it out. Then, pour the amount of bubbly active starter that your recipe calls for into that bowl. For example, if it says "100 grams of active starter," pour 100 grams into the bowl.
The rest of the jar can be stored in your fridge and "woken up," or made bubbly again to rise your next bread loaf when ever you want to bake a loaf of bread!
If you want to try a super easy and straightforward sourdough artisan loaf, try this recipe right here:
FOLLOW THIS BASIC SOURDOUGH BREAD RECIPE FOR BEGINNERS!
This is an incredibly easy to follow sourdough recipe for beginners! I wrote every step out in detail, but if there is something I missed, or you have a question on, please leave me a comment below! I try to personally answer all comments!
Oh an this is an actually easy beginner sourdough bread because there are:
- NO stretch and folds
- NO overnight ferment
- NO difficult shaping
- NO Dutch oven
There are SO many videos that say it's beginner and it really is not. This one IS!
STEP 1: MIX THE DOUGH
Grab a mixing bowl or your standing mixer bowl and add it to your kitchen scale. Make sure you are measuring for grams and zero the scale out.
You'll add these 4 basic sourdough bread ingredients:
- 180 grams active bubbly sourdough starter from your jar (~ 1 ⅛ cup)
- 260 grams room temperature filtered water (~1 ¼ cup)
- 410 grams unbleached BREAD flour (~2 ¼ cups)
- 6 grams unrefined unbleached salt (~1 teaspoon)
I like to use my standing mixer to knead the ingredients to make it super easy, but you can easily knead this in a bowl or countertop.
Knead the dough in your standing mixer until it is smooth and elastic and is pulling away from the sides of the bowl. When it is kneaded enough, it should not be sticking to your fingers.
It took about 12 minutes to knead in my standing mixer on speed 2.
STEP 2: BULK RISE
Cover your mixing bowl (or put the dough into a bowl if you kneaded it on the counter) and let it rise until doubled in size. Mine took about 6 hours.
Bulk rise basically is another name for the sourdough "first rise."
The bulk rise timing can be different for everyone based on the strength of your sourdough starter, how old your sourdough starter is, and how warm your house is! Keep an eye on your dough during this time.
You are looking for your dough to double in size to create those beautiful sourdough air pockets and a light fluffy crumb.
Do not let it continue to grow after double in size, as exciting as it is to see the dough expanding with your brand new sourdough starter!
Sourdough is done with the first rise when you poke a finger in and it springs back half way.
If you did over rise your dough, it will not be able to hold its shape for a sourdough bread loaf, but can be dumped into a sheet tray and baked as focaccia bread.
STEP 3: SECOND RISE IN LOAF PAN
Once your sourdough is doubled in size, turn it onto an un-floured counter top. Gently stretch the sourdough to the width of a bread loaf pan, and double the length. Kind of like cinnamon roll dough!
Roll it the dough up and place it seam side down in the bread loaf pan.
Let your dough rise in the bread loaf pan until almost doubled in size. About 2-4 hours.
Make sure it is somewhere warm during second rise or it ill take a very long time to rise! I like to put mine in my oven warmer, or in my oven with the light on.
This is my favorite part of this easy and actually beginner sourdough recipe. Because you get to see your sourdough starter rising your bread, but not get mixed up with all the steps of an artisan sourdough bread loaf (like stretch and folds, shaping, shaping a second time, using a Dutch oven).
And yes, you can put your loaf pan into the fridge covered in a plastic bag overnight if you don't feel like baking it today. The fridge does not stop fermentation, it simply slows it down. The next day, take it out of the fridge and let it finish rising until almost double in size and then bake it!
STEP 4: BAKE SOURDOUGH BREAD!
When your dough is almost double in size inside the loaf pan, preheat the oven to 450 degrees Fahrenheit.
If you want a darker brown crust: Brush the top with a egg wash (a beaten egg brushed over the top with a pastry brush).
If you want an even more open crumb: Use a sharp knife or bread lame to slice across the top of your loaf before baking.
Bake your sourdough bread loaf on the center rack for about 20 minutes.
And that is it!
Let your sourdough bread cool completely before slicing it. Enjoy this because you have just made a bread with wild yeast that you grew yourself!
HOW TO ACTIVATE A STORED NO DISCARD SOURDOUGH STARTER FOR BAKING
The next time you want to bake a sourdough bread loaf, simply take your sourdough starter from the fridge. I like to do this the night before, so that my sourdough starter is active and bubbly the next morning for mixing the dough. I like to do my first rise (bulk ferment) during the day where I can check on it. Then, I can bake it in the evening for dinner, or, refrigerate it overnight for baking on the next day and an even more delicious flavor.
Check your recipe for how much active sourdough starter is needed. All you have to do is divide that number of active bubbly starter in half. Add half of that number in grams of flour and half in water and feed it directly to your starter jar.
For example:
- Recipe calls for 150 grams of active starter, feed your jar 75 grams of flour and 75 grams of water
- Recipe calls for 250 grams of active starter, feed your jar 125 grams of flour and 125 grams of water (although at this amount you might need a bigger jar!)
Rest the fed sourdough starter at room temperature, preferably somewhere warm like in your oven overnight, or until it is bubbly and double in size.
Once it is bubbly and double in size, pour the amount of starter you need directly into your mixing bowl! Store the rest of your starter in the fridge for next time!
HOW TO MAINTAIN/ FEED YOUR NO DISCARD SOURDOUGH STARTER IN THE FRIDGE
If you do not bake often and just want to simply grow a sourdough starter, or use the inactive starter for easy "sourdough discard" recipes, you can give it a simple feeding every 7-10 days.
To feed your no discard sourdough starter, remove the jar from the fridge every 7-10 days. It is good to mark the feedings on the calendar because if you let your sourdough sit for too long it might require extra work to wake it back up!
- Add 25 grams flour and 25 grams of water, mix the jar until you see no dry flour bits left.
- Scrape the sides of your jar down as best as you can.
- Place your jar somewhere warm to feed it overnight (it will get bubbly again and rise)
- Once fed and double in size, you can put the jar back in the fridge.
If you are starting to get too much starter, you can divide it between two jars and give that second no discard jar to a friend! Or, if you're not ready to take on active sourdough baking, try out a sourdough discard bread recipe, it is an excellent no waste way to use up extra sourdough starter!
If you don't use your sourdough as often, you will probably notice that it is not getting quite as bubbly or it is taking a very long time to rise. This is totally normal for a less fed sourdough starter.
HOW TO MAKE A CLASSIC SOURDOUGH STARTER FROM SCRATCH: THE DISCARD METHOD
This section covers a classic sourdough starter, where you discard half at each feeding!
STEP 1: START WITH WHOLE WHEAT FLOUR & WATER
- Add 1 cup of whole wheat flour to the jar.
- Add ½ cup room temperature water.
- Stir well until it forms a ball.
- Scrape down the sides of your jar very well.
- Cover your jar with cheesecloth.
- Secure it with a rubber band.
- Place somewhere warm for about 24-48 hours.
STEP 2: LOOK FOR ACTIVITY
Depending on how warm your house is, it could take between 24-48 hours to see activity in your new sourdough starter. In those 24-48 hours, when you see a lot of bubbles and the volume is about double:
- Discard half of the wheat flour sourdough mixture
- Add 1 cup unbleached all purpose flour
- Add ½ cup room temperature filtered water
- Stir the flour in completely
- Cover with a cloth
- Place somewhere warm another 24 hours
- Repeat steps 1-6 every morning for 7-14 days.
YOUR MORNING SOURDOUGH ROUTINE FOR DAYS 4-14:
- Discard half of the sourdough starter in the jar. You can use this discard to make quick breads, muffins and other yummy treats.
- Add 1 cup UNBLEACHED all-purpose flour (or 100% whole wheat flour for more flavor)
- Add ½ cup room temperature water
- Stir COMPLETELY
- Cover with the cheesecloth
- Store somewhere warm where it gets airflow
What to do with sourdough discard? Don't want to waste all that high quality flour from growing your sourdough? Me either!
Try these easy Sourdough Discard Recipes:
- Easy Sourdough Discard Lemon Poppy Seed Bread
- Vegan Banana Bread with Sourdough Discard
- Sourdough Discard Banana Walnut Muffins
- Healthy Blueberry Muffins with Sourdough Discard
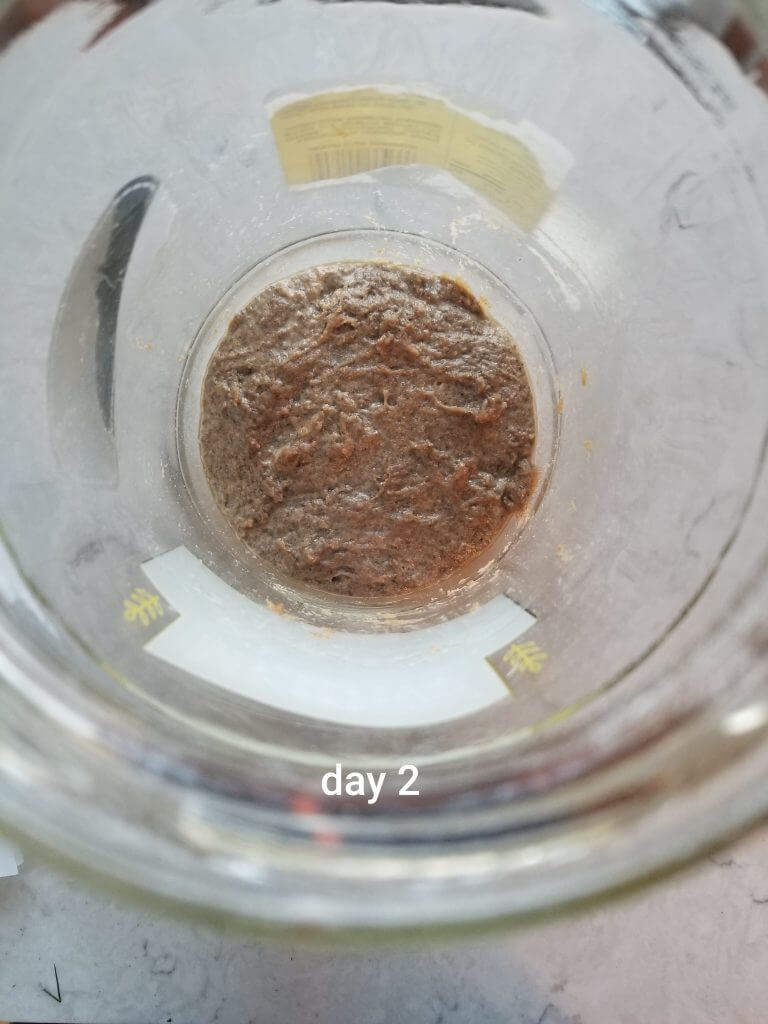
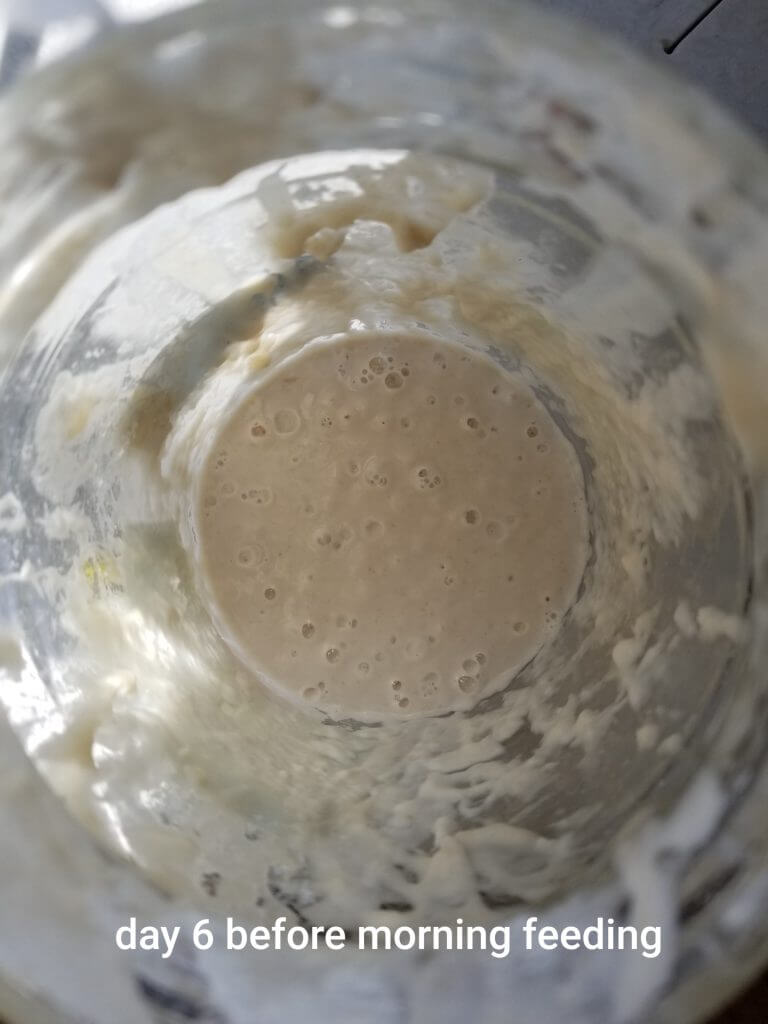
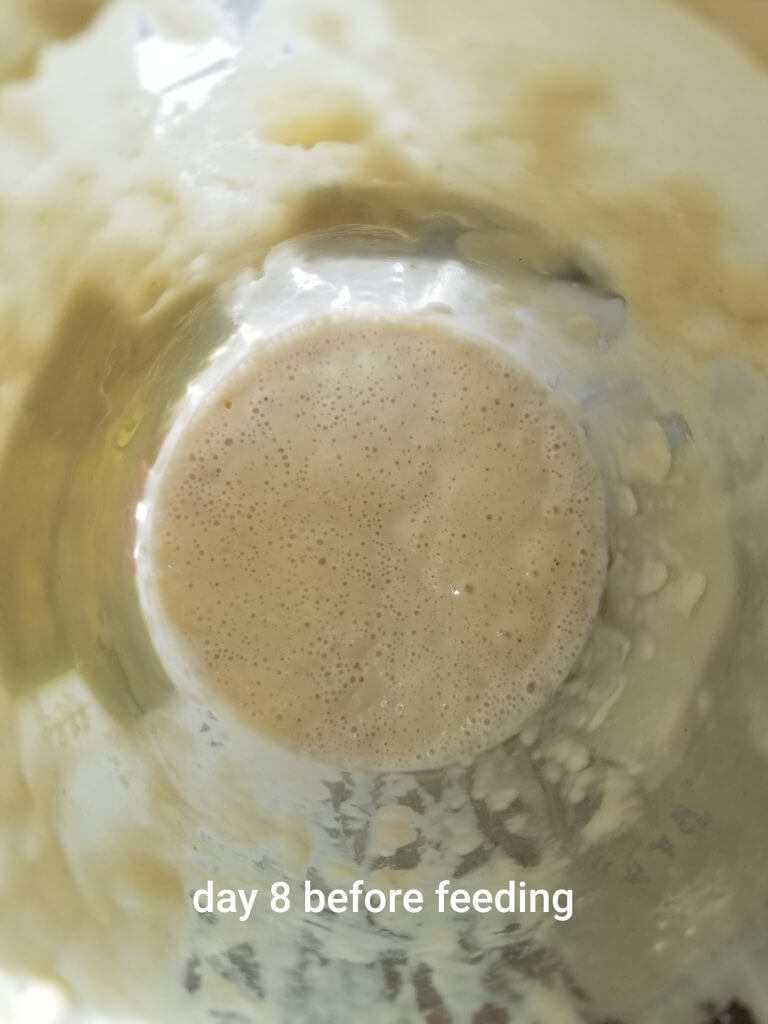
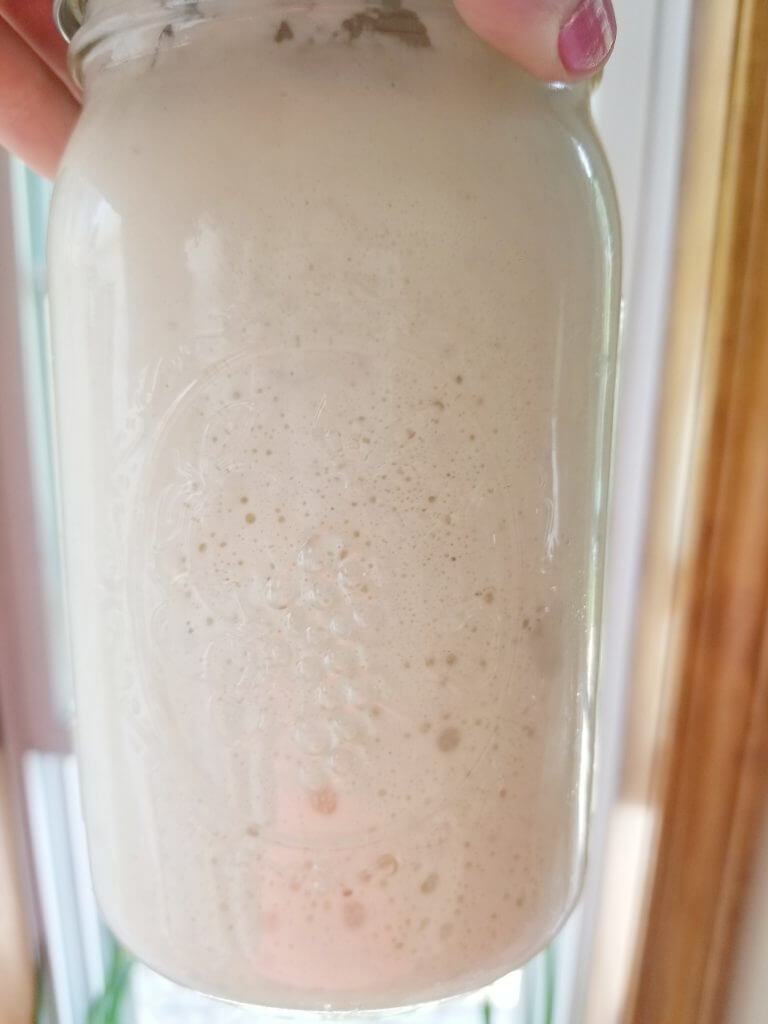
DAY 6, we are starting to get a lot more bubbles!
Now that you see so many bubbles and activity in your sourdough starter, you can start monitoring how fast it grows after feeding.
Add a rubber band level to where the dough is AFTER you fed it. You should be able to see bubbles when you look at it from the side too, that shows your starter has a lot of wild yeast and activity. You are looking for your starter to double in size within 2 hours after feeding.
HOW CAN I TELL IF MY SOURDOUGH IS READY TO USE?
If your sourdough starter is ready, the rubber band will be in the MIDDLE of the dough.
Meaning, the volume doubled after you fed it. Timing to double in size really depends on how old your starter is and how warm your house is. It is a huge range of 2-12 or more hours.
Once it is double in size, you can bake a sourdough recipe with your brand new sourdough starter! Or, put it in the fridge to take out and feed (activate) any time you want to bake!
What to do with your sourdough now? Try these overnight sourdough recipes:

WEEKLY MAINTENANCE OF YOUR SOURDOUGH STARTER.
You can feed your sourdough starter from the fridge as little as once a week, or as often as you use some of it in a recipe!
Okay so now you have your sourdough safely stored in the fridge. But don't forget about it! You will need to give it weekly feedings. Or, feed it after every time you use some for a recipe!
The sourdough maintenance feeding is the same as it was when you are growing it:
- Discard half (either as a discard, or to be used in your sourdough recipes)
- Add 1 cup unbleached all purpose flour to the jar
- Add ½ cup room temperature water to the jar
- Stir it in, cover it, and let it stand at room temperature 2 hours to get it going.
- Bake with it, or Store in the fridge and repeat again next week!
A NO DISCARD SOURDOUGH STARTER MAINTENANCE IS DIFFERENT, SO IF YOU ARE DOING THIS METHOD, SEE THE NO DISCARD METHOD ABOVE.


SOURDOUGH STARTER TROUBLESHOOTING & PROBLEMS
- My sourdough starter reaks! Is this normal?
- My sourdough starter has a thick layer of liquid on top, did it go bad?
- It's day 7 and there are no bubbles in my sourdough starter, what should I do?
- There is mold growing in my sourdough starter jar, can I use it?
If you try my No Discard Sourdough Starter Recipe, please let me know your thoughts by leaving a rating and comment below! Ready for more? Subscribe to my newsletter or follow along on Pinterest, Instagram, Facebook, and Youtube!
No Discard Sourdough Starter Recipe!
Equipment
- large mason jar
- spoon to mix
- spatula
- rubber band
- kitchen scale
Ingredients
For daily feeding for approximately 7 days
- 25 grams whole wheat flour
- 25 grams room temperature water
Instructions
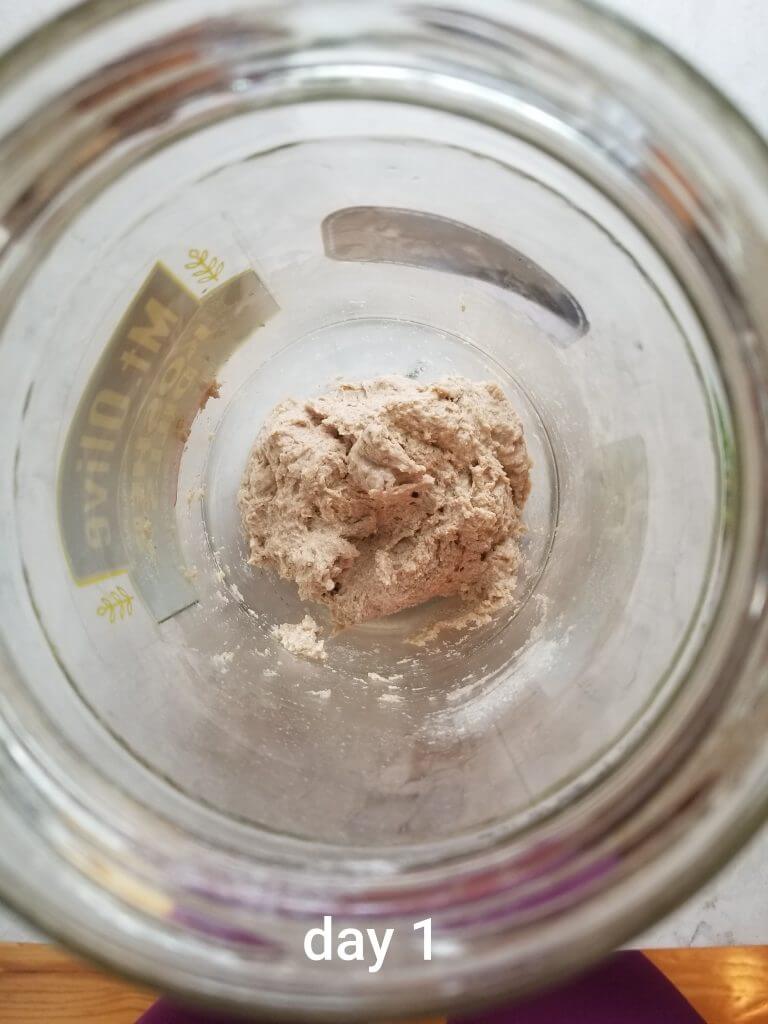
Day 1:
- In a clean glass jar, I like to use a 32 ounce one, add 25 grams of whole wheat flour and 25 grams of room temperature filtered water.
- Mix until there are no dry pieces of flour left. Scrape down the sides of your jar to get everything to the bottom.
- Loosely (not sealed tight) cover your jar and place somewhere warm to rise for 24 hours. Good places are in the oven or in the microwave wrapped in a towel.
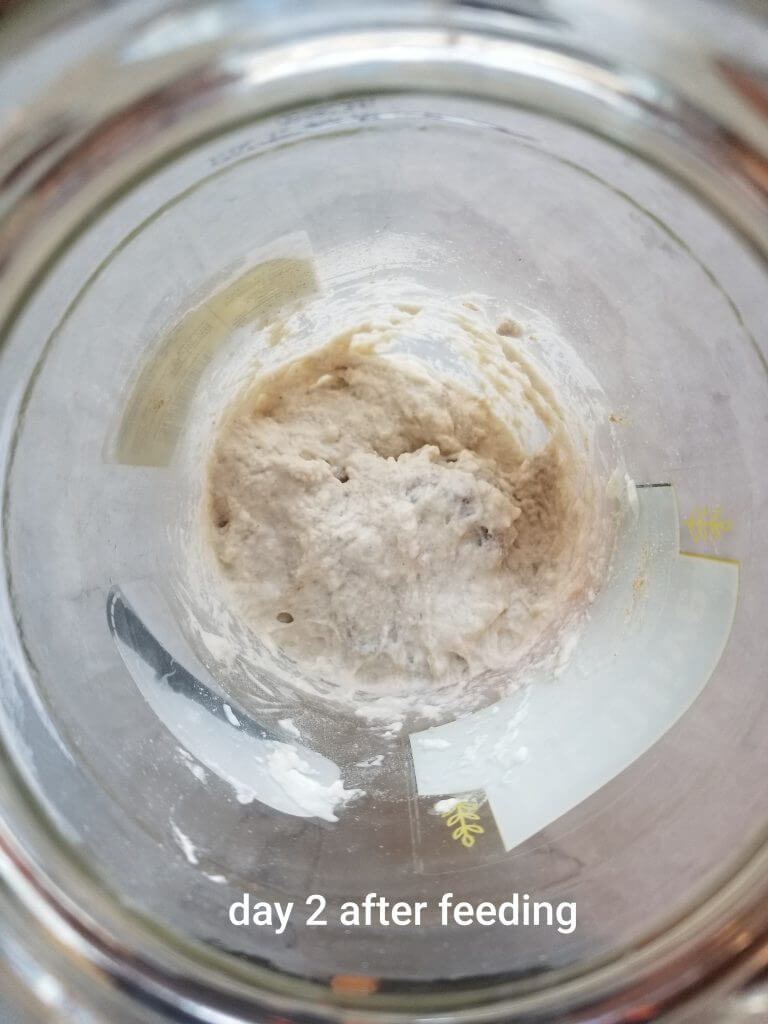
Day 2-5:
- Each day at the same time, add 25 grams of whole wheat flour and 25 grams of room temperature filtered water.
- Mix until there is no dry flour left and scrape the sides down.
- Cover loosely and store somewhere warm until the next days feeding.
Day 6 & 7:
- Feed the daily 25 grams of flour and 25 grams of water. On day 6, use a rubber band to mark your sourdough jar where the last feeding is. You will be able to see if your sourdough starter has doubled in size.By day 7 or 8 the starter should be doubling in size within about 12 hours after feeding.After it is doubling in size, it is active and ready to bake with!


Anna
It's like you've read my mind!
I see so many people making sourdough these days and really want to jump on that train!
Thanks for sharing 🙂
Rebecca
Thanks for this great tutorial. This takes out all the guesswork.
[email protected]
Thanks Anna! I hope you try this one! I really wanted to come up with one that you didn't need to fuss with weighing the ingredients out
[email protected]
I'm glad you found it helpful! It definitely works faster when it is summer time 🙂
Jean
Is there any way to use the half that use discard every day. Seems quite wasteful to me. No offense meant as I really appreciate the post and I am absolutely going to get started. I just dint like to be wasteful.
Rosemary
I know, me either!! You can definitely use the discard every day! I love to bake mine into muffins, quick breads, pancakes, brownies, and one of my friends even used theirs for crackers! You could even put the discard in another jar feed it and give it to a friend who wants to start one too 🙂
Pam Gray
Now I have a beautiful healthy starter…Now what? How much flour? Bake time? I’m lost 🤷♀️
Rosemary
Yay I'm so glad it's so beautiful and healthy! Now you can store it in your fridge for once a week feedings (read this section "HOW CAN I TELL IF MY SOURDOUGH IS READY TO STORE IN THE FRIDGE?"), or whenever you take from it to bake! You can use part of it in my sourdough cinnamon rolls, or any sourdough recipe on line! Hope this helps <3
Christy Asay
Great job!!!
Do you have the recipe for Lemon, poppyseed bread using sourdough discard?
Thank you
Rosemary
Yes! Here's the link https://thehintofrosemary.com/dairy-free-lemon-poppy-seed-bread-recipe/
enjoy!
Joanne
I made it, it doubled so I made the focaccia. The focaccia did not rise. Attempting to continue to feed with no big bubbles or other results. It smells good. What now?
Rosemary
Use it in a discard recipe (like muffins or pancakes), then feed it the amount you need for your focaccia, once it is doubled, use it in the focaccia recipe. Make sure to keep it somewhere warm! Let me know if it works this time
Boni
When I'm ready to bake do I take the no discard starter out of the refrigerator and add more flour and water first and then wait for it to double or do I take the starter I need out first and then add more flour and water? I'm unclear on this step.
I'm excited as my starter is on day 4 and looking very nice. Love all you info.
Thank you so
Goh Jacqueline
Hi Rosemary, my no discard sourdough starter is on its 7th day but it is not bubbling nor doubling yet. It has a nice thick consistency. Nice fruity smell on day 2-4. Regular daily feeding of 25g unbleached whole grain flour & 25g filtered water and rest in warm place. Is there anything wrong? Please advise and thank you in advance.
Rosemary
Hi Jacqueline, it seems like it is getting some activity with that nice fruity smell. You could keep feeding it a couple more days and see if it starts to rise, or, use the whole thing in a quick bread recipe that also uses baking powder/ soda (like sourdough muffins, sourdough quick bread) and then continue feeding into the jar and you should see doubling in size. I hope this helps! <3
Rosemary
Hi Boni, you can do either way! If you're new to sourdough, I would recommend weighing out half the amount you need from the refrigerator jar into your mixing bowl, then feeding it the other half. For example, if you need 100g active bubbly starter for your recipe, scoop 50g out of your jar from the fridge into your mixing bowl, 25g flour (unbleached) and 25g water mix it very well. Room temp to warm water will make it bubble faster. Hope this helps ! <3
Nat
I thought this was a no discard starter guide but in the video, you’re taking some out everytime you add flour and water.
CK
Excellent and detailed guide for no-discard starter.
Janet Soo
My starter already double up n overflow the jar now the 5th day only. Can this be kept in the fridge now or need to wait till the 7th day or can I start the baking of a load bread now?
Dmc
Hello, I am trying to no discard starter. I’m just wondering when it’s time to bake to I grease the pan and do I use another pan on top?
Heide
Hello! I just want to question your instructions for baking time. Every single recipe I have for sourdough calls for around an hour - most say bake at 450 for 40 minutes with the lid on, and then 20 min with the lid off. Unless you are making really small loaves, 20 minutes is not going to work.
Heide
Hello! I am on Day 4 of your sourdough starter instructions. Yes, there are bubbles appearing on top (no rising or doubling yet) but the starter is very elastic and firm (almost like dough). Other starters I have seen on YouTube look very soft and frothy. Just wondering if I should perhaps boost the amount of water I am adding, or just keep on with the 25g flour 25g water plan?
Pat
I’m on day 7 of following the no discard directions with freshly ground whole wheat flour. So far, there is a mildly sour smell but no rise or significant bubbles. What can I do differently?
Rosemary
I nat, you're absolutely right I'm sorry about that I have an old video linked to this that is a discard sourdough starter method. I hope to get my no discard sourdough starter video up asap!
Rosemary
I'm so happy you found it helpful!
Rosemary
You can use it now or store in the fridge! As soon as it is doubling that means it is active and ready to use how ever you like! Just keep in mind it is a new starter so your first bread might take a little longer to rise- keep an eye on your dough during the process !
Rosemary
Hello, you can use your starter when it is doubling in size after feeding! If your cup is getting full and you're not seeing it double, use the sourdough starter in one of my "sourdough discard" muffin recipes and continue feeding your starter until it gets stronger and is doubling in size! Hope this helps
Susan
You don’t mention a sour smell etc. when should that occur
Anonymous
Can i use all purpose flour for this recipe?
Llamamama
With the no discard you said you like yo take yours out the night before.
So you add the flour and water and leave it overnight?
Or just leave it overnight right out of the fridge then add flour and water?
Karen Brooks
Why am I getting "hooch" each day; starting on day 2? I am pouring off, then add watet and flour for the day. Thank you.
Nancy D.
Can I use Einkorn flour in this recipe? Thank you.
Nancy