


How to make kombucha at home recipe! Kombucha is so easy to make at home, once you get the hang of it, you'll be making it for years to come!
Why spend $4 per bottle when you could brew your own kombucha at home for like $.10 a bottle! Plus, its really fun to make and experiment with different flavorings. More on that later.
Want to learn how to make Starbucks and Dunkin recipes at home, but healthier? Make sure to read my Healthy Iced Caramel Macchiato Tutorial, featuring my homemade healthy date caramel recipe that can also be used in tons of my healthy dessert recipes!
INGREDIENTS YOU NEED FOR HOMEMADE KOMBUCHA
Kombucha is so easy to make at home with just a few simple ingredients! I'm going to show you how to make kombucha if you already have a skoby from a friend, or a store bought skoby.
There is no difference in using a skoby you bought on line, got from a friend, or if you want to make your own! The only difference is your preference: do you simply want to brew homemade kombucha, or do you want to have everything from scratch and make your own skoby too.
Ingredients you will need to brew kombucha at home:
- 1 scoby
- Kombucha (either from your last brew, or if it's your first time then a bottle from the store)
- 1 cup sugar (unbleached and unrefined is very important)
- 6 black tea bags
- 1 gallon of filtered water
And that is it!
TOOLS/ SUPPLIES YOU NEED FOR HOMEMADE KOMBUCHA
You can get as fancy here or keep it as simple as you want! For me, I like to keep things simple and cheap. I literally used a washed old pickle jar to brew my kombucha in.
Just DO make sure you are using GLASS to brew kombucha in.
Tools and supplies you need to get started making homemade kombucha:
- Glass gallon jar
- Cheesecloth to cover during fermentation
- A rubber band to secure the cheesecloth down
And that's it! Kombucha has been done for years and years and does not have to be complicated and should definitely not be expensive!
Note, kombucha releases a lot of gas during fermentation, so I don't like to use a sealed container like some people do because this means that I have to remember to "burp" the jar every day to release pressure build up.
Once you've collected all your ingredients and supplies, let's get started!
HOW TO MAKE KOMBUCHA!
The first and one of the most important steps in kombucha making is having a clean and bad bacteria free work area. You can't go back after a batch of kombucha is contaminated, so start fresh with a clean work space!
STEP 1: CLEAN AND SANITIZE YOUR JARS AND WORK AREA
Wash your counter tops and kombucha jar and your hands with warm soapy water. Then, use a freshly washed cloth to wipe everything down again with warm water to get any soap particles off. You should have a clean kombucha jar, a clean counter, and be working with clean hands.
STEP 2: BREW BLACK TEA
Add the one cup of sugar to the bottom of the glass jar or pitcher. Heat the water and pour it into the jar (about ½ way). Stir to dissolve the sugar.
**NO this is not for a sweetened tea. This is necessary food for the bacteria to eat while it is fermenting. IF you don’t add the sugar, the bacteria will have nothing to eat and will die. If you don’t like a sweet taste, let it go to about 2 weeks and the bacteria will have eaten almost all of the sugar.
Add 6 black tea bags and let them steep about 5-10 minutes. You can do more or less time if you want a stronger tea flavor.
Remove the black tea bags. Test the temperature of your water with a thermometer. You will want it ~75-85 degrees. You can speed this process up by adding more cool filtered water. I like to let it cool naturally, because you don’t want it to be too cold. Room temperature is perfect for the healthy kombucha bacteria to thrive.
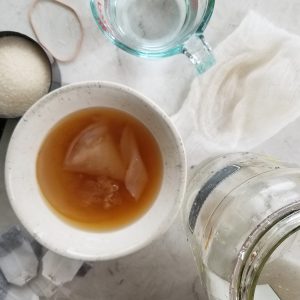
STEP 3: ADD SKOBY & STARTER
Once your black tea is 75-85 degrees, you can add 1 cup of starter and 1 skoby. Your starter is just a cup of kombucha from your last batch. If this is your first homemade kombucha brew, add a bottle of store bought kombucha. If you purchased a skoby, it will typically come with a starter included.
After you added the starter and skoby, top the jar off with room temperature water, leaving about 1 inch of room at the top. Stir to make sure that everything is evenly combined. Cover with cheesecloth and secure the cheesecloth with a rubber band.
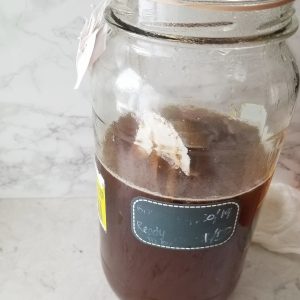
FIRST FERMENT
This is now called the first ferment stage of making homemade kombucha. This is when the bacteria from the skoby and starter are eating the sugar in your jar and creating more kombucha.
It is very important to put your kombucha in the correct place for optimal kombucha brewing. You want your kombucha spot to be 3 things:
- Warm but not hot
- Clean with airflow
- Out of direct sunlight
Put your kombucha jar somewhere, out of direct sunlight with ample air flow. And somewhere that it is not going to get bumped into. You will want it to be undisturbed until it is time for the kombucha taste test.
Three things I have learned on where NOT to put my kombucha while it's fermenting:
- Inside a dark cupboard of closet, because it will mold.
- Near the garbage can, because it will mold.
- Near strong smelling onions, garlic, or produce, because the kombucha will absorb these flavors.
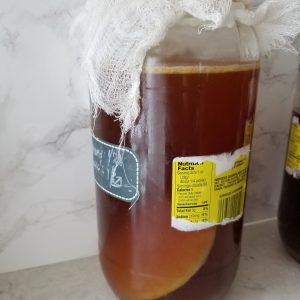
Ideally, put kombucha on an out of the way shelf, that gets some light but is not directly in front of a window. You can see that this time I chose to put it on a shelf, where it is not too dark, and it can get some airflow. This is also in my kitchen, where it is quite warm year round.


KOMBUCHA TASTE TEST
At 7 days, you can pour a little kombucha out and see how it tastes. If you like it to be more acidic, let it go longer. If you like the sweetness, you can move on to bottling it (also called the "second ferment").
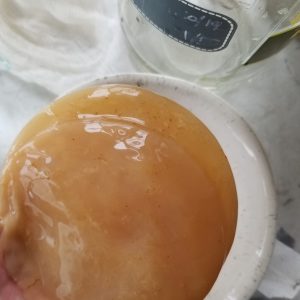
You will see your skoby floating, and even sinking to the bottom. There may be dark pieces of goop hanging off the bottom. Don’t worry, this is all normal.
IF there is fuzzy mold on top, discard it. It is likely you didn’t cool your tea enough before adding your skoby and killed the good bacteria. Or, your house was too cold and created mold.
Always remember that ferments like some warmth and COLD=MOLD!
SECONDARY FERMENTATION (BOTTLING & FLAVORING)
Remove your skoby with about 1 cup of the kombucha and place it in a dish to the side for your next kombucha batch.
For bottling, there are many different flavors you can add. Read my full blog on bottling and flavoring your kombucha.
But basically, right now you are creating carbonation through the second fermentation. This time, you will be sealing your kombucha bottle, while during the first fermentation we used cheesecloth.
If you don’t want your kombucha carbonated, that is okay too, you can still get all the healthy kombucha benefits. Simply pour your kombucha into an airtight container and put it directly into the fridge.
HOW TO BOTTLE AND FLAVOR KOMBUCHA FOR CARBONATION
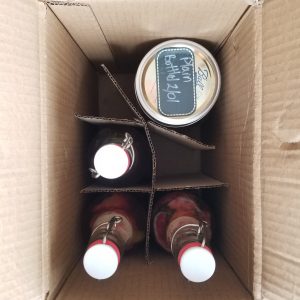
Line up clean glass jars that can be sealed air tight.
Add ~1” of some kind of juice to the bottom. I usually use mango or guava juice. You can also experiment with different herbs and even fresh mashed fruit. Fruit or fruit juice is important because it has natural sugars that the kombucha bacteria feed on to create carbonation.

Pour your kombucha in and leave about 2” of room at the top.
Seal and let them sit for 2-3 days at room temperature.
They may grow another tiny skoby, so instead of drinking a chunky surprise, you can strain the kombucha and pour it back into the bottle. Seal it again. Store it in your fridge.
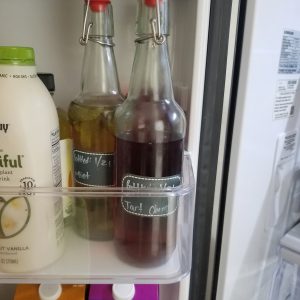
It will stay for up to a month. And there you have it. You have brewed your own kombucha!
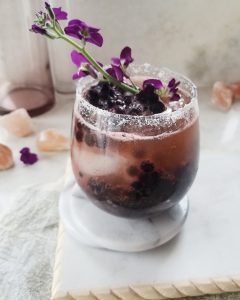
Make some gut-healthy mocktails with your home made kombucha!
More Probiotic Gut Healing Drink Recipes you're going to love!
- Bottling & Flavoring Homemade Kombucha
- Probiotic Mocktail
- Mango Orange Mojito Mocktail
- Spicy Mango Margarita Mocktail
- Probiotic Strawberry Margarita Mocktail
- Kombucha Mocktail
- UTI Prevention Mocktail
- Pina Colada Mocktail
- Frozen Watermelon Mocktail
- Middle Eastern Pomegranate Mocktail
- Natural Cough Syrup Recipe
And make sure to try out my Nature's Gatorade, Raspberry Lemon Chia Water, or my Blueberry Chia Seed Water to really help your gut health!
If you try my Homemade Kombucha Recipe, please let me know your thoughts by leaving a rating and comment below! Ready for more? Subscribe to my newsletter or follow along on Pinterest, Instagram, Facebook, and Youtube!

How to Make the Best Kombucha
Equipment
- 1 glass gallon sized pitcher
- cheesecloth
- rubber band
- thermometer
Ingredients
- 1 scoby
- 1 cup kombucha from your last brew, or a bottle from the store
- 1 cup sugar unbleached and unrefined
- 6 organic black tea bags unbleached tea bags
- 1 gallon filtered water
Instructions
- Clean and sanitize your work area and the kombucha brewing jar.
- Add sugar to jar along with boiling water to fill jar half way.Stir to dissolve the sugar.
- Add the black tea bags and let the tea steep to your preference and the water has cooled down.
- Once the water is cool, add the 1 cup kombucha, skoby, and room temperature water to fill the jar, leaving 1 inch of room at the top.
- Add cheesecloth and secure with a rubber band.
- Place kombucha fermentation jar somewhere warm and out of direct sunlight for 7+ days.
- Taste test at 7 days and if it is to your liking, you can no move on to the secondary fermentation of bottling and flavoring your kombucha.*Make sure to save the scoby and 1 cup of the kombucha for your next batch.
- Grab bottling jars and add herbs, fruit juice, and fresh fruit of choice to the bottom of each jar. Top with the fresh brewed kombucha.
- Seal and let these jars ferment again to create carbonation for 2-3 days.Once they are carbonated, store in the fridge for up to a month!


Leave me a comment!